It’s every dog owner’s worst nightmare to come home and find his or her dog not breathing. Sadly, these accidents do happen and that’s why it’s important to know what to do in this terrible situation.
If you do find yourself in this situation, CPR or Cardiopulmonary Resuscitation can be an effective way to start your dog’s breathing again. However, we need to acknowledge that dog CPR can be hazardous and cause a lot of damage. Therefore, make sure to perform dog CPR only when it’s completely needed.
Now, CPR should be administrated a little different for small dogs compared to larger dogs. So, this article’s going to be split into two sections, dogs under 30 pounds and dogs 30 pounds and over.
Dog CPR for Dogs Less than 30 Pounds
Step 1: Evaluate Their Condition
Before performing dog CPR, it’s important to make sure it’s actually needed. You can check your dog’s breathing by putting your hand or cheek against their nose to see if you can feel their breath. Another indicator is if their chest is moving up and down. If your dog’s chest isn’t moving and you can’t feel their breath, it’s time to start the CPR process.
Step 2: Lay Your Dog Down
First, lay your dog on the floor with their left side facing up and their right side facing down. Make sure it’s a flat surface and not something like a cushion or mattress. These surfaces will make it more likely the CPR won’t be effective.
Next, straighten their head and neck. This will create a direct passage way for when their breathing resumes.
Then, pull the tongue forward. Make sure it rests against your dog’s back teeth and shut their mouth.
Lastly, position yourself behind their back.
Step 3: Cup Your Palms
Cup your palms and hold your dog by placing one hand on each side of your dog above the heart area. This will give you total access to both sides of the heart region allowing for your dog to get more exposure to the CPR.
Step 4: Compress The Chest
Push hard and fast down on the chest at a rate of 100 to 120 compressions per minutes. However, make sure to only compress 1/3 or ½ half of the width of your dog’s chest. Before starting a new compression, it’s imperative the chest fully recoils.

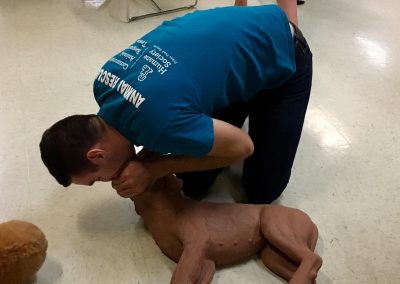
Step 5: Rescue Breaths
To administer rescue breaths, close your dog’s mouth and extend their neck to open their airway. Next, cover your dog’s nose with your mouth and breath into their nose until their chest starts to rise. If you're alone, give one rescue breath for every five compressions; if you aren’t alone and have the help of a second person, give one rescue breath for every 2-3 compressions.

Step 6: Check Their Heartbeat and Breathing Again
Make sure to briefly check every two minutes their heartbeat and breathing. It’s important to see if you’re making progress. Continue CPR until your dog’s pulse is steady and they’re breathing on his or her own.
Step 7: Get Help
Even if you’re dog starts to breathe again, it’s important to get to a vet immediately. After all, you don’t know what exactly caused their breathing to stop.
CPR for Dogs 30 Pounds and Over
Step 1: Evaluate Their Condition
Before performing dog CPR, it’s important to make sure it’s actually needed. You can check your dog’s breathing by putting your hand or cheek against their nose to see if you can feel their breath. Another indicator is if their chest is moving up and down. If your dog’s chest isn’t moving and you can’t feel their breath, it’s time to start the CPR process.
Step 2: Lay Your Dog Down
Lay your dog on the floor with their left side facing up and their right side facing down. Make sure it’s a flat surface and not something like a cushion or mattress. These surfaces will make it more likely the CPR won’t be effective.
Next, straighten their head and neck. This will create a direct passage way for when their breathing resumes.
Then, pull the tongue forward. Make sure it rests against your dog’s back teeth and shut their mouth.
Lastly, position yourself behind their back.
Step 3: Place One Your Hands on the Rib Cage
Position one palm on your dog’s rib cage and place your other hand on top of it. This will give you more leverage when you start to compress. Remember, the rib cage is right near the heart; therefore, by placing your hands near the heart, it will hopefully help it start beating again.
Step 4: Press the Rib Cage
While pressing on the rib cage, be sure you don’t bend your dog’s elbows. Also, it’s important to make sure you're pressing the rib cage in a downward motion.
Step 5: Compress the Chest
Push hard and fast down on the chest at a rate of 80 compressions per minutes. However, make sure to only compress 1/3 or 1/4 of the width of your dog’s chest. Before starting a new compression, it’s imperative the chest fully recoils.
Step 6: Rescue Breaths
To administer rescue breaths, close your dog’s muzzle. Next, cover your dog’s nose with your mouth and breath into their nose until their chest starts to rise. If you are alone, give one rescue breath for every 5 compressions; if you aren’t alone and have the help of a second person, give one rescue breath for every 2 compressions.
Step 7: Check Their Heartbeat and Breathing Again
Make sure to briefly check every two minutes their heartbeat and breathing. It’s important to see if you’re making progress. Continue CPR until your dog’s pulse is steady and they’re breathing on his or her own. If you reach 10 minutes and it’s not working, it’s sadly time to stop.

Step 8: Get Help
Even if you’re dog starts to breathe again, it’s important to get to a vet immediately. After all, you don’t know what exactly caused their breathing to stop.
Now, that you know the basics about dog CPR…
You can feel more comfortable about the way you would react in the nightmare scenarios where it would be required. If you want to be even more prepared for these scenarios, you could buy a dog first aid kit or get some CPR training and earn you CPR certification.